Connection Mode
The OpenSumi extension supports extensions in both Browser and Node environments. Generally, we recommend that you only register views at the Browser entry and write extension business logic in the Node entry.
Front-end and Back-end communication

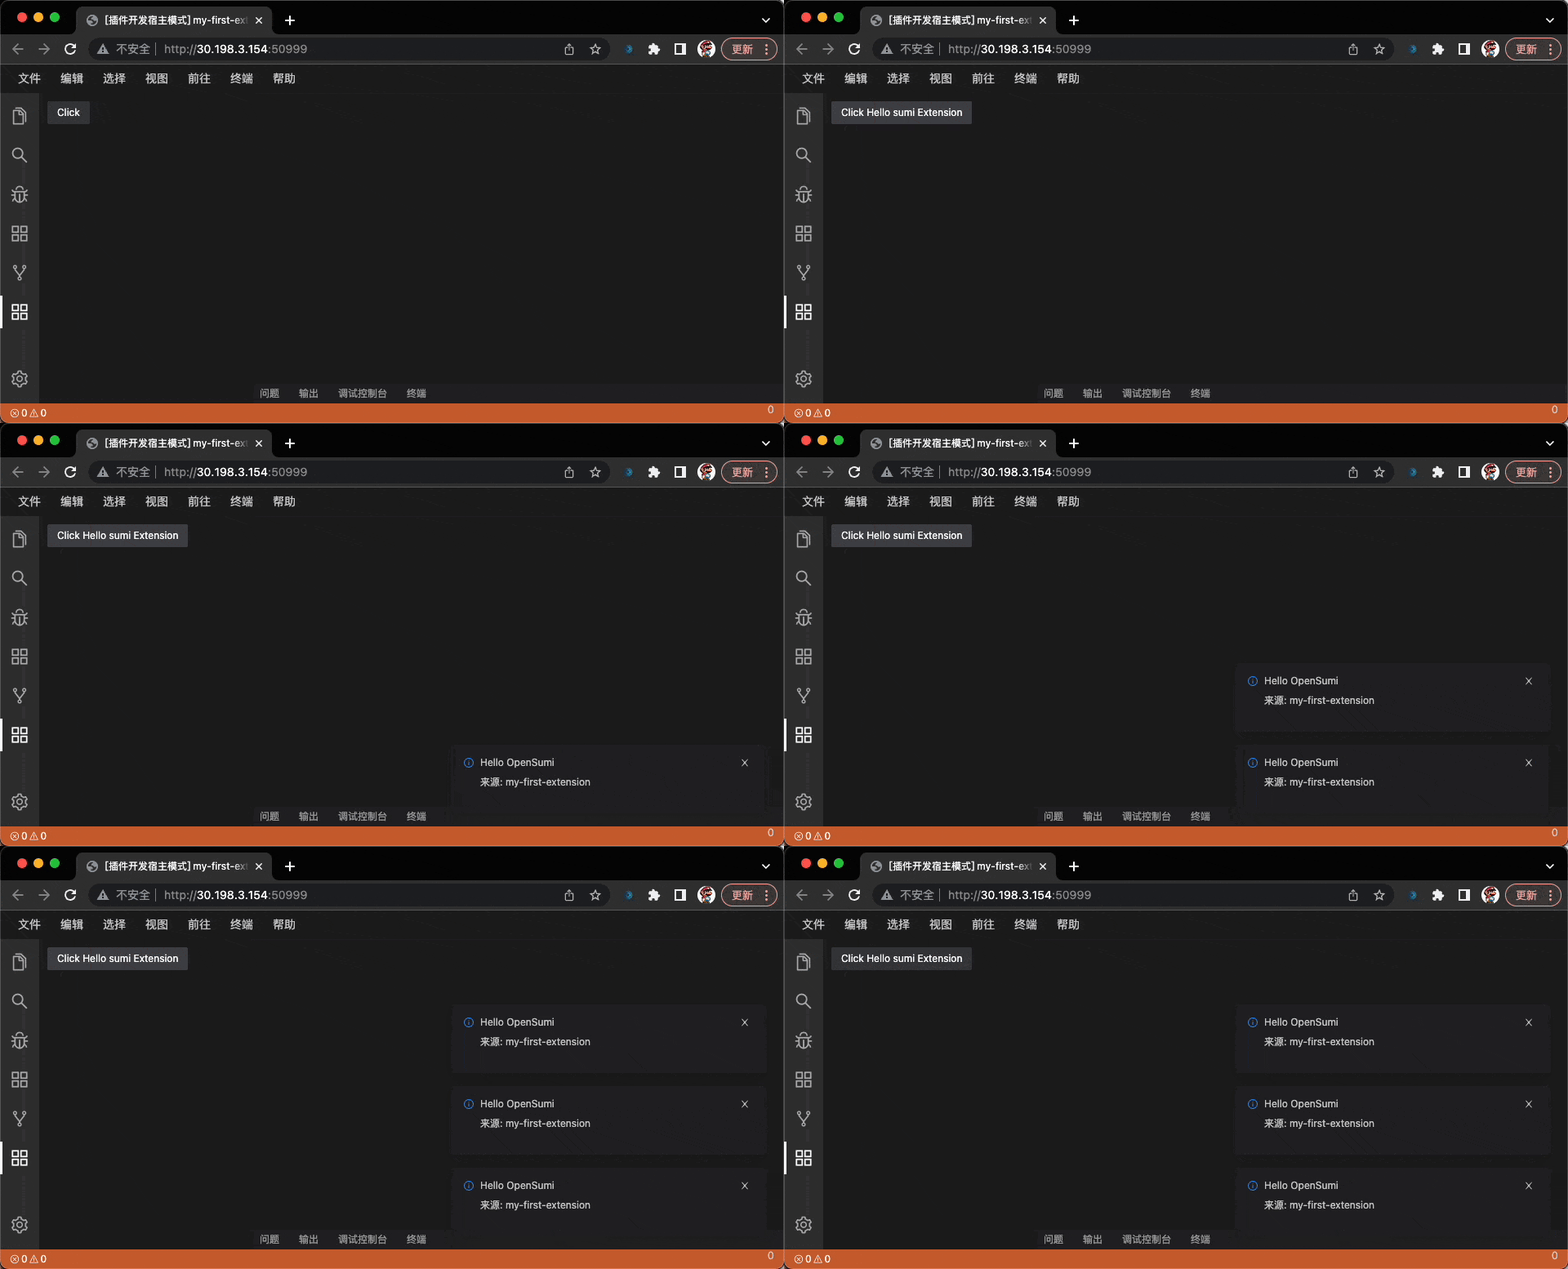
Considering the above scenario, I want to pop up an error message when the button is clicked. This requires declaring a button in the left area of the extension at the Browser entry and implementing the logic to pop up the error message in the Node entry of the extension.
Browser entry
Implement the component in extend/browser/Leftview.tsx:
// extend/browser/Leftview.tsx
import * as React from 'react';

import { Button } from '@ali/ide-components';

export const Leftview: React.FC<IComponentProps<INodeService>> = ({
  sumiExtendSet,
  sumiExtendService
}) => {
  const defaultTitle = 'Click';
  const [title, setTitle] = useState(defaultTitle);

  function onDidUpdateTitle(val: string) {
    setTitle(defaultTitle + ' ' + val);
  }

  useEffect(() => {
    if (sumiExtendSet) {
      sumiExtendSet.set({
        updateTitle: onDidUpdateTitle
      });
    }
  }, []);
  function handleClick() {
    // sumiExtendService.node is an API Proxy
    sumiExtendService.node.sayHello();
  }
  return (
    <Button size="small" onClick={handleClick}>
      {Title}
    </Button>
  );
};
Export components under extend/browser/index.ts:
// extend/browser/index.ts
import { Leftview } from './toolbar-button';

export { Leftview };
Declare where and how components are rendered in package.json:
// package.json
{
  "kaitianContributes": {
    "browserMain": "./out/browser/index.js",
    "nodeMain": "./out/node/index.js",
    "viewsProxies": ["Leftview"],
    "browserViews": {
      "left": {
        "type": "add",
        "view": [
          {
            "id": "Leftview",
            "icon": "extension"
          }
        ]
      }
    }
  }
}
In this code, we declare a view whose rendering position is the position of the left sidebar.
In the component, we bind an event handler to the button, and call the method from props.sumiExtendService.node when clicked (please note that this is a proxy of the extension Node entry API, this code will not be directly in the running in a Node environment).
At the same time, we also bind an updateTitle method in the Browser entry, which can also be called in the subsequent Node entry code.
Node entry
// extend/node/index.ts
import * as sumi from 'sumi'; // sumi node API (extends vscode)

export function activate(context: sumi.ExtensionContext) {
  const { componentProxy, registerExtendModuleService } = context;

  registerExtendModuleService({
    async sayHello() {
      // Call the `updateTitle` method registered in the Leftview component
      await componentProxy.Leftview.updateTitle('Hello sumi Extension');
      sumi.window.showInformationMessage('Hello OpenSumi');
      return 'Hello sumi Extension';
    }
  });
}
In this code, we call registerExtendModuleService in the activate function to register a method named sayHello.
In this way, the method of the Node entry can be called through the front end in the OpenSumi extension, and you can also encapsulate complex logic in the extension of the Node environment to avoid running too many tasks in the UI extension and causing the interface to freeze.
At the same time, we need to obtain the front-end methods bound through sumiExtendSet in the front-end components through componentProxy at the Node entry.
The final running effect is as follows:

Use Command to communication
In addition to the above methods, you can also use the more familiar command mechanism to achieve front-end and back-end communication. Command is a very important and common mechanism in OpenSumi and VS Code. Use registerCommand and executeCommand two methods To register and execute commands, OpenSumi also provides the executeCommand method in the front-end API (in order to reduce the complexity, the registerCommand method is not provided for now). In this way, you can call the commands registered in the Node entry through executeCommand on the front end.
// Node environment
import { commands } from 'sumi';

export function activate() {
  commands.regiterCommand('getProjectType', () => {
    //...
  });
}

// front-end environment

import { commands } from 'sumi-browser';

export const MyProjectView = () => {
  const handleGetProjectType = useCallback(() => {
    commands.executeCommand('getProjectType').then(res => {
      //...
    });
  }, []);
  return (
    <div>
      <Button onClick={handleGetProjectType}>Get Project Type</Button>
    </div>
  );
};
Communication between extensions
In the VS Code extension, the API can be exposed externally by returning a set of objects through the activate function. For other extensions, the extension instance can be obtained through vscode.extensions.getExtension, and these APIs can be called.
For example, extension A exposes sayHello interface in activate function
function activate(context) {
  return {
    sayHello() {
      // return sayHello
      //...
    }
  };
}
In extension B it can be used like this:
async function activate(context) {
  const exta = vscode.extensions.getExtension('{ID of extension A}'); // such as `opensumi.a`

  await exta.activate();
  exta.exports.sayHello(); // call sayHello
}
In the Node entry of the OpenSumi extension, this method can also be used to call each other, and the attribute for accessing the Node entry of the OpenSumi extension is named exetndsExports, which is different from VS Code.
Similarly, the activate method in extend/node/index.ts returns the object:
function activate(context) {
  return {
    sayHello() {
      // return sayHello
      //...
    }
  };
}
In another extension it can be used like this:
async function activate(context) {
  const exta = sumi.extensions.getExtension('{ID of extension A}'); // such as `opensumi.a`

  await exta.activate();
  exta.extendExports.sayHello(); // call sayHello
}